When you use Bootstrap for your project, you usually end up with a lot of unused CSS. The full Bootstrap CSS bundle is around 227 KB which is quite heavy for most projects that only use a fraction of the available components. In this post, we’ll walk through how to set up a Bootstrap 5 project with Webpack and then use PurgeCSS to strip out the unused CSS, bringing the bundle size down to around 5.8 KB.
Prerequisites
- Node.js installed on your machine.
- Basic familiarity with npm and JavaScript build tools.
Setting up Bootstrap 5 with Webpack
First, let’s create a new project and install the required dependencies.
mkdir bs5-webpack && cd bs5-webpack
npm init -y
Install the dependencies:
npm install bootstrap @popperjs/core express compression
npm install --save-dev webpack webpack-cli webpack-dev-server autoprefixer css-loader css-minimizer-webpack-plugin html-webpack-plugin mini-css-extract-plugin postcss-loader sass sass-loader style-loader terser-webpack-plugin purgecss-webpack-plugin
Project Structure
Set up the following project structure:
bs5-webpack/
├── src/
│   ├── js/
│   │   └── main.js
│   ├── scss/
│   │   └── styles.scss
│   └── index.html
├── index.js
├── webpack.config.js
└── package.json
Import Bootstrap SCSS Selectively
Create src/scss/styles.scss and import only the Bootstrap components you need. This is the first step of optimization, importing only what’s required:
@import "bootstrap/scss/mixins/banner";
@include bsBanner("");

// Configuration
@import "bootstrap/scss/functions";
@import "bootstrap/scss/variables";
@import "bootstrap/scss/variables-dark";
@import "bootstrap/scss/maps";
@import "bootstrap/scss/mixins";
@import "bootstrap/scss/utilities";

// Layout & components
@import "bootstrap/scss/root";
@import "bootstrap/scss/reboot";
@import "bootstrap/scss/type";
@import "bootstrap/scss/images";
@import "bootstrap/scss/containers";
@import "bootstrap/scss/grid";
@import "bootstrap/scss/tables";
@import "bootstrap/scss/buttons";
@import "bootstrap/scss/dropdown";
@import "bootstrap/scss/nav";
@import "bootstrap/scss/card";

// Helpers
@import "bootstrap/scss/helpers";

// Utilities
@import "bootstrap/scss/utilities/api";
Set up the JavaScript Entry Point
Create src/js/main.js to import the SCSS and any Bootstrap JS you need:
'use strict'

// Import our custom CSS
import '../scss/styles.scss'

// Import only the Bootstrap JS components you need
import { Dropdown } from 'bootstrap/js/src/dropdown';
Create the HTML Page
Create src/index.html with your page content. For this example, we’ll use the Bootstrap Pricing example template which includes cards, tables, navs, dropdowns, and a footer.
Configure Webpack
Create a webpack.config.js in the project root. This configuration handles SCSS compilation, CSS extraction, and minification:
'use strict'

const path = require('path')
const autoprefixer = require('autoprefixer')
const HtmlWebpackPlugin = require('html-webpack-plugin')
const miniCssExtractPlugin = require('mini-css-extract-plugin')
const TerserPlugin = require('terser-webpack-plugin');
const CssMinimizerPlugin = require('css-minimizer-webpack-plugin');

module.exports = {
    mode: 'development',
    entry: './src/js/main.js',
    output: {
        filename: 'main.js',
        path: path.resolve(__dirname, 'dist')
    },
    devServer: {
        static: path.resolve(__dirname, 'dist'),
        port: 8080,
        hot: true
    },
    plugins: [
        new HtmlWebpackPlugin({ template: './src/index.html' }),
        new miniCssExtractPlugin(),
    ],
    module: {
        rules: [
            {
                test: /\.(scss)$/,
                use: [
                    { loader: miniCssExtractPlugin.loader },
                    { loader: 'css-loader' },
                    {
                        loader: 'postcss-loader',
                        options: {
                            postcssOptions: {
                                plugins: [autoprefixer]
                            }
                        }
                    },
                    { loader: 'sass-loader' }
                ]
            }
        ]
    },
    optimization: {
        minimize: true,
        minimizer: [
            new TerserPlugin({ terserOptions: { compress: {} } }),
            new CssMinimizerPlugin(),
        ],
    },
}
Set up Express for Testing
Create index.js in the project root to serve the built files with compression:
const express = require('express');
const compression = require('compression');

const app = express();
const port = 3000;

app.use(compression());
app.use(express.static('dist'));

app.listen(port, () => {
    console.log(`Server is running on port ${port}`);
});
Update package.json Scripts
Add the following scripts to your package.json:
{
  "scripts": {
    "start": "webpack serve",
    "build": "webpack build --mode=production",
    "express": "node index.js",
    "test": "echo \"Error: no test specified\" && exit 1"
  }
}
Build and Check Initial Bundle Size
With everything set up, run the following command to build your project and start the Express server:
npm run build && npm run express
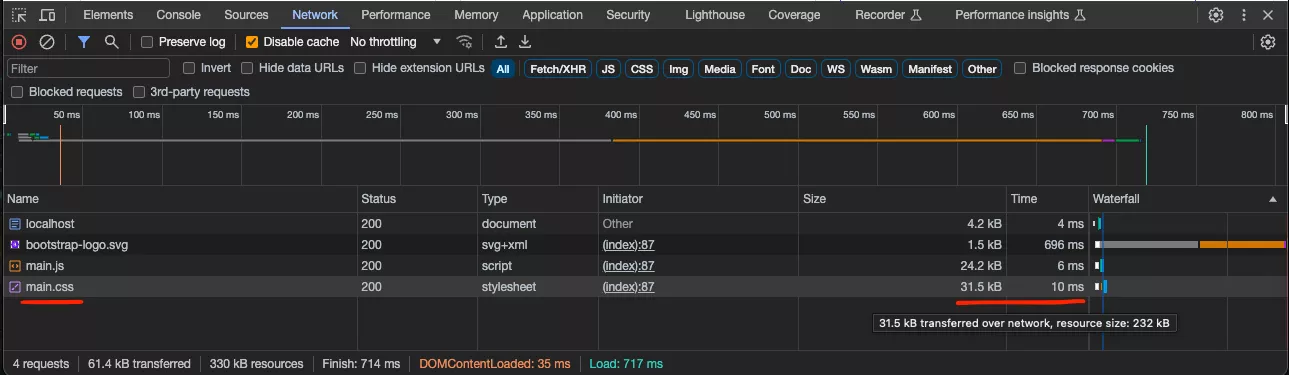
Visit the page at http://localhost:3000 , right-click, select “inspect,” and navigate to the network tab in the Inspector. Upon refreshing the page, you should see the main.css size, which should now be 31.5 KB.
Configure the PurgeCSS (with caution)
PurgeCSS is a valuable tool for eliminating unused CSS from your project. Before using using PurgeCSS make sure that you are very well aware of which classes and components are required. Because PurgeCSS will most likely remove some other state-related classes like dropdown states and animations.
PurgeCSS looks for a list of classes used in your HTML and based on that removes those that aren’t used. This is where you need to use a safelist to fine-tune things according to your usage. We will integrate PurgeCSS into Webpack using the purgecss-webpack-plugin. Follow these steps:
Install the plugin with the following command:
npm i --save-dev purgecss-webpack-plugin
Next, update your webpack.config.js with the provided changes. Below are the necessary code modifications:
const path = require('path')
const glob = require("glob");
const autoprefixer = require('autoprefixer')
const HtmlWebpackPlugin = require('html-webpack-plugin')
const miniCssExtractPlugin = require('mini-css-extract-plugin')
const {PurgeCSSPlugin} = require("purgecss-webpack-plugin");

const PATHS = {
  src: path.join(__dirname, "src"),
};

module.exports = {
   // ... (existing configuration)
   plugins: [
     // ... (existing plugins)
     new miniCssExtractPlugin(),
     new PurgeCSSPlugin({
       paths: glob.sync(`${PATHS.src}/**/*`, {nodir: true}),
       safelist: {
         deep: [/dropdown-menu$/]
       },
     })
   ],
   // ... (existing module rules)
}
Explanation of Changes:
- We’ve imported the glob library for efficient path handling.
- We’ve introduced the PurgeCSSPlugin and defined a PATHS object specifying the source directory.
- In the plugins section, we’ve added a new instance of PurgeCSSPlugin. This instance will search for CSS classes across the specified paths, and it includes a safelist rule for classes ending with “dropdown-menu.”
You may need to customize the safelist according to your specific needs. For more details, check the plugin’s documentation .
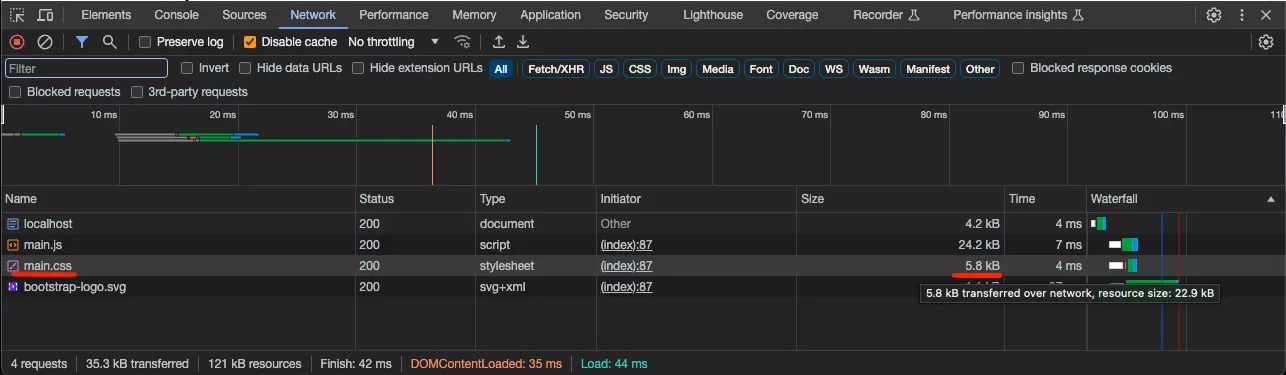
Finally, let’s run the build again to get the final bundle size: npm run build && npm run express. Then check the final bundle size in Inspector should be 5.8 KB.
Conclusion
In conclusion, optimizing your Bootstrap project by removing unused CSS can significantly reduce your bundle size. By following the steps outlined in this post, you can achieve a much smaller production bundle. Initially, the CSS bundle size was around 227 KB, but after implementing PurgeCSS and the necessary configurations, the final bundle size was reduced to a lean 5.8 KB.
This level of optimization can greatly enhance the performance of your web application, ensuring that only the necessary styles are included in your production code. For more details and access to the complete source code, please refer to the GitHub repository provided.